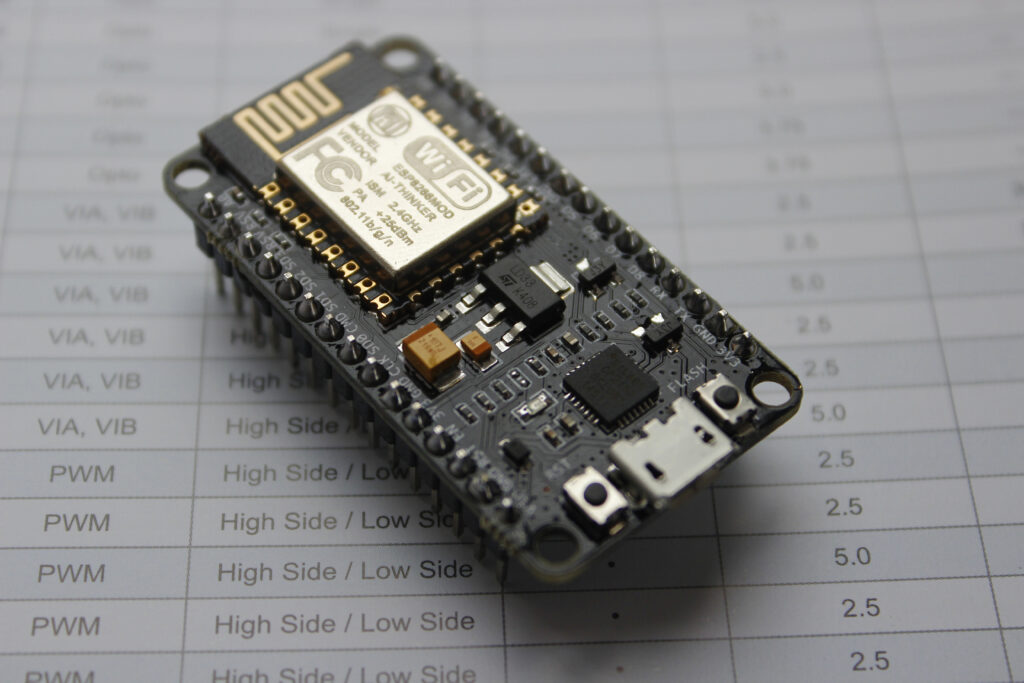
If you’re just starting out with DIY electronics or building your tenth smart home gadget, chances are you’ve used — or at least heard of — the ESP8266 NodeMCU development board.
It’s been around for years, but this board hasn’t lost its place on my desk. And there’s a good reason for that.
The NodeMCU is cheap, flexible, easy to work with, and still incredibly relevant for Wi-Fi-based Arduino projects in 2025. Whether you’re building a smart sensor, weather station, alarm system, or something completely wild, this board can probably do the job.
This article is my take — after years of working with the ESP8266 — on what makes the NodeMCU such a solid choice, what you need to watch out for, and why it still holds its own against newer alternatives.

What Is the ESP8266 NodeMCU?
Let’s start with the basics.
The ESP8266 is a low-cost Wi-Fi microchip developed by Espressif Systems. It became wildly popular thanks to its built-in Wi-Fi stack, small size, and price (as low as $2-$3). The NodeMCU is a development board based on the ESP8266, and it adds everything you need to get started without soldering or special tools.
That includes:
- A USB-to-Serial interface (so you can upload code from your PC),
- A voltage regulator (so you can power it with 5V USB safely),
- Breadboard-compatible headers,
- And some useful LEDs for debugging.
Buy it now from Amazon at best price (only 7$)!
Out of the box, it works with the Arduino IDE, the ESP8266 core, and dozens of libraries. You don’t need to write low-level code or understand networking protocols — it’s all abstracted for you.
Technical Specs: What You’re Working With
Despite its tiny size and price, the NodeMCU is surprisingly capable.
| Feature | Details |
|---|---|
| SoC | Espressif ESP8266EX |
| CPU | 32-bit, 80MHz (can be overclocked to 160MHz) |
| Flash Memory | 4MB (some versions have 8MB) |
| RAM | ~50KB available to the user |
| Wi-Fi | 802.11 b/g/n, full TCP/IP stack |
| GPIO | 11–13 pins (some used internally) |
| ADC | 1 x 10-bit analog input (0–1V) |
| UART / I2C / SPI | Yes |
| Programming | USB (CH340 or CP2102 serial chip) |
| Voltage | 3.3V logic, powered via 5V micro USB |
It’s enough to power most simple IoT projects. You can connect sensors, control relays, drive LEDs or displays, talk to the internet over MQTT, HTTP, or WebSockets — all from one tiny board.
Why the ESP8266 NodeMCU Still Matters in 2025
Let’s be honest: There are newer boards out there. The ESP32 is faster, has Bluetooth, more GPIO, better analog support. Boards like the Raspberry Pi Pico W bring dual-core CPUs and wireless to the table. So why would you still use the NodeMCU?
Here’s why I keep coming back to it:
1. It Just Works
I’ve never had to fight this board. Plug it in, fire up the Arduino IDE, and you’re coding in minutes. Libraries for almost every sensor and module exist, with examples.
2. It’s Dirt Cheap
You can buy 5 boards for the price of a Raspberry Pi. That makes it great for permanent installations or when you’re experimenting and don’t want to risk a more expensive board.
3. The Community Is Massive
From Stack Overflow to GitHub to random blogs, the amount of info out there for the NodeMCU is enormous. This really helps when you’re debugging or trying something new.
4. Perfect Fit for IoT
The ESP8266 was designed with wireless communication in mind. It supports all the common protocols — HTTP, HTTPS, MQTT, NTP, WebSockets. And there are tons of open-source libraries built on top of it.
Common Use Cases (From Real Projects)
If you’re wondering what kinds of things you can build with this board, here are a few real examples I’ve either built myself or seen in the wild:
✅ NTP-Synced Clocks
Keep perfect time using NTP servers, even add daylight saving support. Add a buzzer, and it becomes a talking clock. See full tutorial on how to Time Sync from NTP Server using ESP8266 WiFi module.
✅ Weather Stations
Use sensors like DHT22 or BME280 to read temperature, humidity, and pressure — then display it on an OLED or LED matrix. Push data to your phone or cloud dashboards. Check a review and tutorial to find which Temperature sensor is the best for your IoT project.
✅ Smart Alarms
Connect PIR sensors, ultrasonic modules, or reed switches to create basic smart alarms. Add Wi-Fi alerts, Telegram notifications, or even IFTTT support.
✅ Home Automation
Control relays for lights or appliances. Connect to Home Assistant via MQTT. Schedule things or automate based on weather or time.
✅ Data Logging
Log sensor data to an SD card, Google Sheets, or your own server. Send data at intervals and run it on deep sleep for months on a battery.
Pros and Cons (No Sugarcoating)
Let’s be real — no board is perfect.
🔥 Pros
- Ultra low cost (often $2–$3 on AliExpress)
- Breadboard-friendly
- Arduino compatible
- Plenty of libraries and tutorials
- Reliable Wi-Fi performance
- Great for low-power apps
⚠️ Cons
- Only 1 analog pin, and it’s 0–1V only
- Limited GPIO (especially if you use flash or serial)
- No Bluetooth
- Not ideal for multitasking
- Can crash with bad code or memory leaks
- Wi-Fi power spikes can reset unstable power supplies
Pinout Tips (Because It’s Confusing at First)

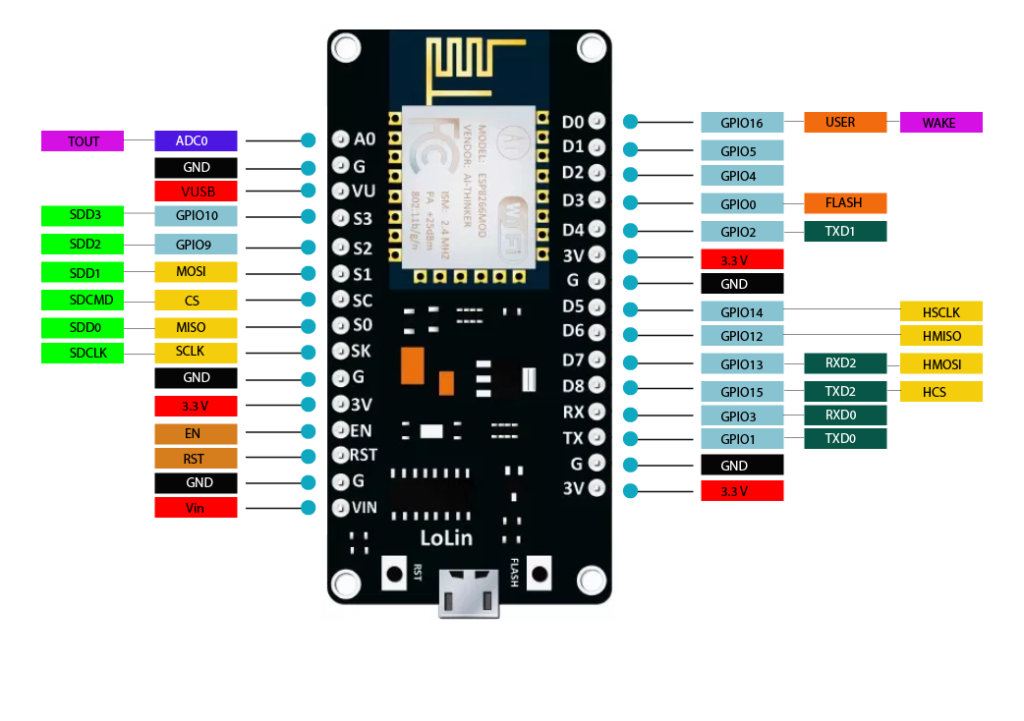
The NodeMCU uses D0, D1, D2… labels, but the actual GPIO numbers are different. For example:
| Label | GPIO |
|---|---|
| D0 | 16 |
| D1 | 5 |
| D2 | 4 |
| D3 | 0 |
| D4 | 2 |
| D5 | 14 |
| D6 | 12 |
| D7 | 13 |
| D8 | 15 |
Also:
- GPIO0, GPIO2, GPIO15 affect boot mode. Use them carefully!
- GPIO16 is the only pin that can wake the ESP from deep sleep.
If you’re connecting sensors, displays, or relays, always double-check which pins are safe to use and which are used internally.
Powering It Right
The ESP8266 can be power-hungry when using Wi-Fi. Some quick tips:
- Use a stable 5V USB supply (500mA minimum)
- If using batteries, regulate to 3.3V with an LDO (not AMS1117 if you’re going low power!)
- For deep sleep, power consumption can go down to <100 µA
You can actually run this board on 2x AA batteries for weeks with the right sleep strategy.
Firmware Options for ESP8266 NodeMCU: Choose Your Style
One of the strengths of the NodeMCU isn’t just the hardware — it’s the flexibility in how you program it. The ESP8266 chip can run several different firmware platforms, each suited for different types of users and projects.
Here are the most popular options:
🔧 1. Arduino Core for ESP8266
This is the most common approach — and the one I personally use for most projects.
- ✅ Program the ESP8266 just like an Arduino using the Arduino IDE or PlatformIO
- ✅ Use libraries like
WiFi.h,ESPAsyncWebServer,PubSubClient,Adafruit_Sensor, etc. - ✅ Great for people familiar with C++ and Arduino syntax
It’s extremely powerful, with lots of examples and support. If you’re reading this article, you’re probably already using it.
📚 Recommended for: Makers, prototypers, anyone comfortable writing C/C++.
🐍 2. MicroPython
Prefer Python over C? MicroPython is a lightweight version of Python designed to run on microcontrollers — and it runs well on the ESP8266.
- ✅ Write Python scripts and upload them directly
- ✅ No need for compilation — edit and run in real-time
- ✅ Clean syntax and fast iteration
The ESP8266 has limited RAM (~50KB free), so keep your code efficient. Still, it’s a great way to explore IoT without diving into C++.
📚 Recommended for: Python lovers, educators, rapid prototyping.
🧱 3. NodeMCU Lua
This is the original firmware the NodeMCU board was built for — a Lua-based scripting platform.
- ✅ Simple, event-driven Lua scripts
- ✅ Lightweight and good for quick automation tasks
- ⚠️ Less active development nowadays
It’s not as popular as it once was, mostly because Arduino and MicroPython are more accessible. But it still works and can be useful in constrained applications.
📚 Recommended for: Legacy users, Lua fans, minimalist projects.
🧰 4. Tasmota
Tasmota is a firmware designed for plug-and-play smart home devices, especially things like Sonoff switches.
- ✅ No coding required — configure via web interface
- ✅ Supports MQTT, HTTP, timers, sensors, relays, and more
- ✅ Easily integrated with Home Assistant and other platforms
It’s mostly used on devices with fixed hardware, but you can absolutely flash it to a NodeMCU and build your own smart switch or sensor.
📚 Recommended for: Smart home builders, Home Assistant users, no-code automations.
🌐 5. ESPHome
Similar to Tasmota, ESPHome is another no-code/low-code firmware used to create smart devices that integrate seamlessly with Home Assistant.
- ✅ YAML-based configuration
- ✅ OTA updates
- ✅ Great sensor, display, and button support
If you’re building an IoT device for your smart home, ESPHome is a dream. You write a YAML file, flash it once, and then configure everything remotely.
📚 Recommended for: Home Assistant users, automation builders, tinkerers.
Flashing Firmware: The Basics
Most of these firmwares can be flashed over USB using tools like:
esptool.py(command-line flashing tool)- NodeMCU PyFlasher (simple GUI for Windows/Mac)
- PlatformIO (for Arduino/MicroPython projects)
- Tasmotizer or ESPHome-Flasher (for no-code firmwares)
The process usually involves:
- Holding down the FLASH button (if your board has one)
- Connecting the board via USB
- Using the tool to flash the
.binfirmware file
If you’re switching between firmwares (say, from Tasmota back to Arduino), it’s a good idea to erase the flash memory first to avoid leftover config junk.
Final Verdict: Still Worth It?
100%.
In 2025, the NodeMCU is no longer cutting-edge. But that’s actually a good thing — it means it’s battle-tested, supported by a huge ecosystem, and reliable.
If you’re learning, it’s forgiving and cheap. If you’re prototyping, it’s fast to get results. If you’re building something permanent, it’s stable and efficient.
You could go with the ESP32 or a Pi Pico W — and for some projects, you absolutely should. But for a lot of the things IoT is really about — sensors, relays, logs, displays, alerts — the humble ESP8266 NodeMCU is still hard to beat.

1 thought on “ESP8266 NodeMCU: Still the Best Starter Board for DIY IoT in 2025”