This system allows you to control a physical barrier using a mobile-friendly web interface. Admins generate guest PINs. Guests enter them through the browser. No hardware keypad. No cloud subscriptions. Just ESP32, Wi-Fi, and a modern user experience.
This is not just a prototype or tutorial — it’s a fully deployed system controlling a real residential barrier using nothing more than an ESP32, a relay module, and Wi-Fi. Guests enter a PIN through a mobile-friendly web interface. Admins can generate temporary guest codes directly from their phones. Behind the scenes, a secure backend validates each request and triggers the gate — all hosted on free-tier services with no subscriptions, no GSM modules, and no vendor lock-in.
In this guide, I’ll show you how I built it step by step — from wiring the hardware to deploying the backend with Cloudflare Workers, hosting the frontend with GitHub Pages, and integrating a secure PIN validation flow.
Table of Contents
You’ll get all the code, diagrams, and documentation you need to replicate or customize the system for your own community.
What the System Does
This system is a modern, mobile-first gate or barrier controller built around an ESP32 microcontroller and a simple relay. Unlike traditional access control systems that rely on GSM modules, physical keypads, or vendor-specific apps, this solution uses a clean web interface, secure cloud logic, and open technologies — with no monthly fees or hosted dependencies.
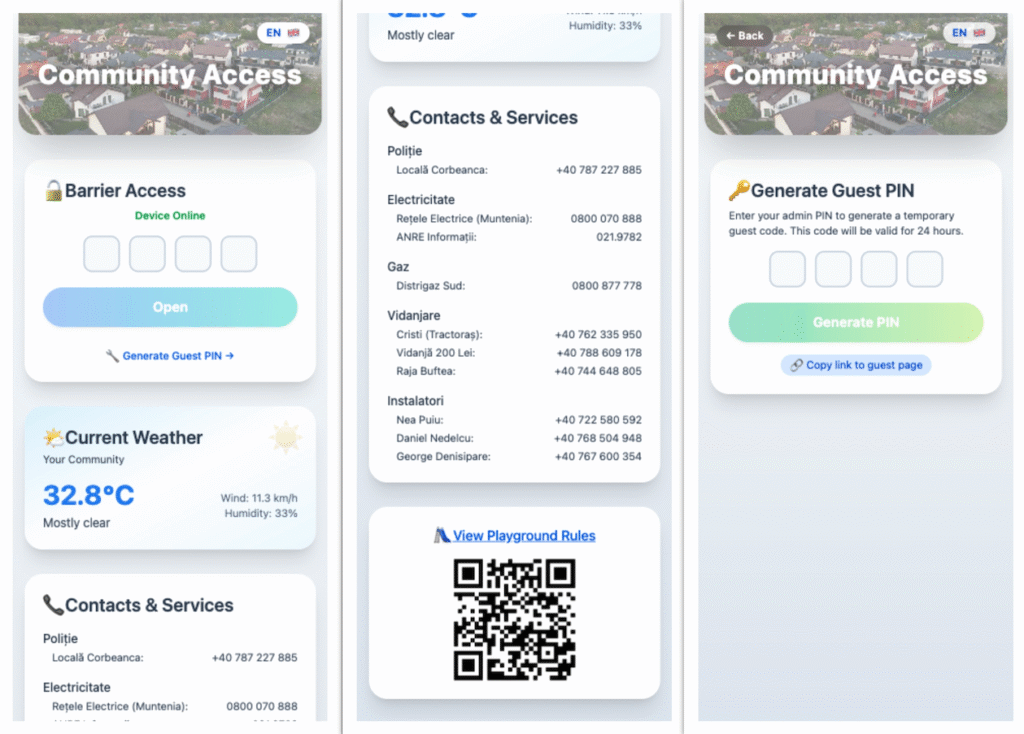
Visitors can access the gate by entering a temporary, time-limited PIN through their smartphone browser. Admins (such as residents or trusted users) can generate these PINs securely through a separate admin page, also accessible via any web device. There are no apps to install, and no hardware beyond the ESP32, relay module, and a Wi-Fi connection.
The entire system is made up of five key components:
- A frontend web interface, built with React and Tailwind CSS, accessible from any browser
- A backend API, hosted with Cloudflare Workers, handling secure PIN validation and PIN generation logic
- A Blynk Cloud integration, used to trigger the relay pin remotely over Wi-Fi
- A persistent KV store, used to track active guest PINs and admin codes with expiration logic
- An ESP32 firmware, flashed with the Arduino IDE, that receives the trigger and activates the barrier
Every component works together to create a fast, simple, secure experience — for guests, for residents, and for you as the builder. The best part? It’s entirely built on free-tier platforms: no subscriptions, no vendor lock-in, and no hosted backend to maintain.
This is not a demo or a prototype. This is a real, working system deployed in a residential environment, managing daily guest access through a clean, browser-based interface.
If you’re looking for a version of this project that uses Bluetooth Low Energy (BLE) instead of Wi-Fi, check out this BLE-based ESP32 barrier gate. It’s optimized for low-power, local-only use with small beacon tags.
The entire system runs within the free-tier limits of the platforms it uses:
- Cloudflare Workers: Up to 100,000 requests per day and 1,000 requests per minute
- Cloudflare KV: 1 million reads and 1,000 writes per day (auto-expiring PINs stored here)
- Blynk Cloud (free tier): 30,000 operations per month, which is more than enough for small communities or households
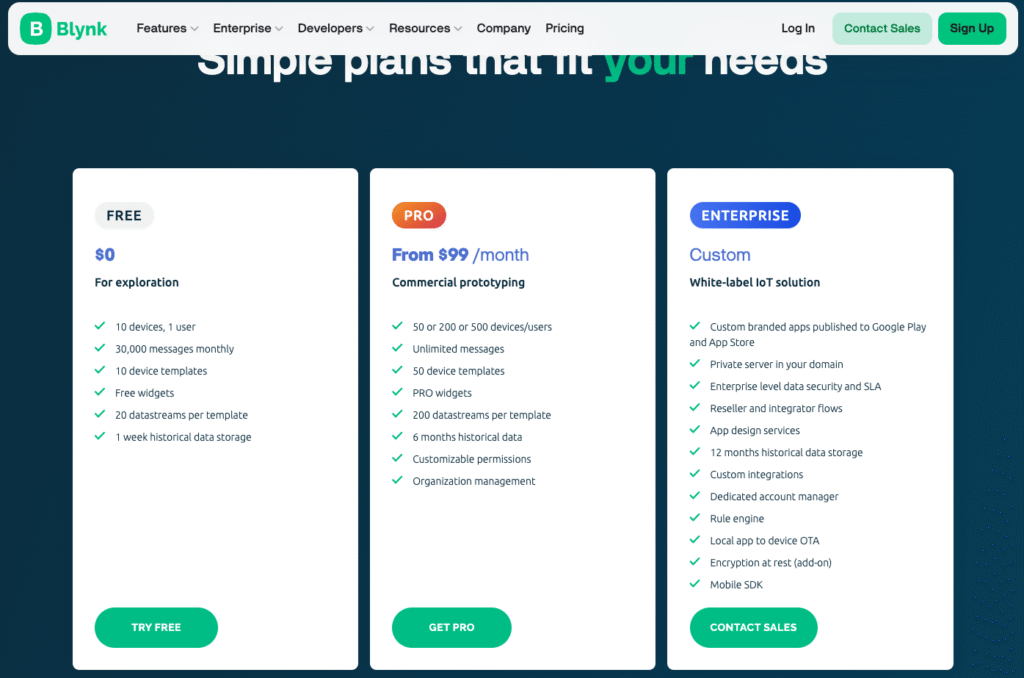
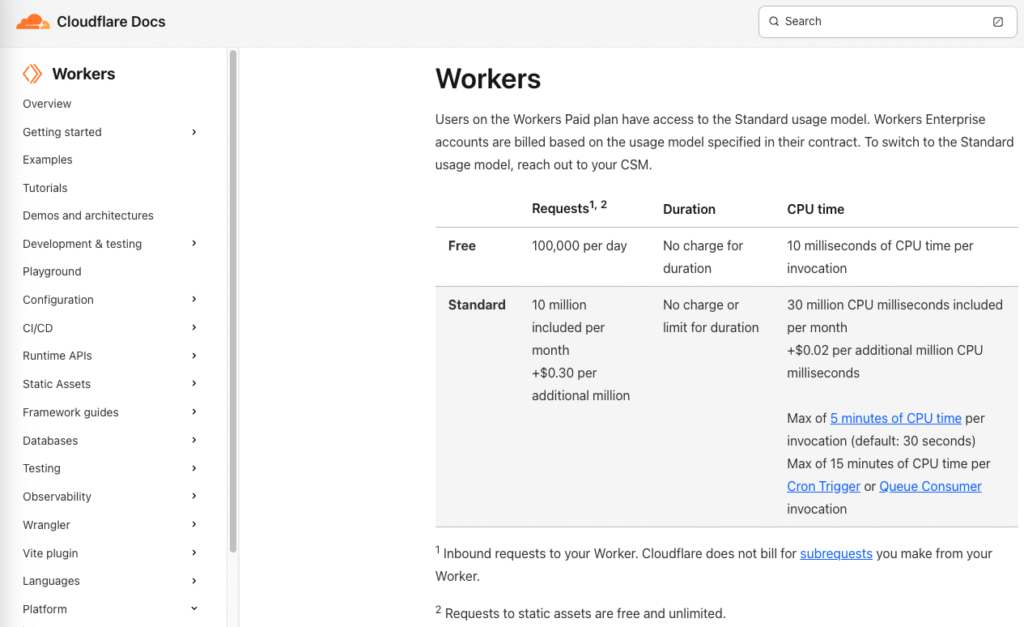
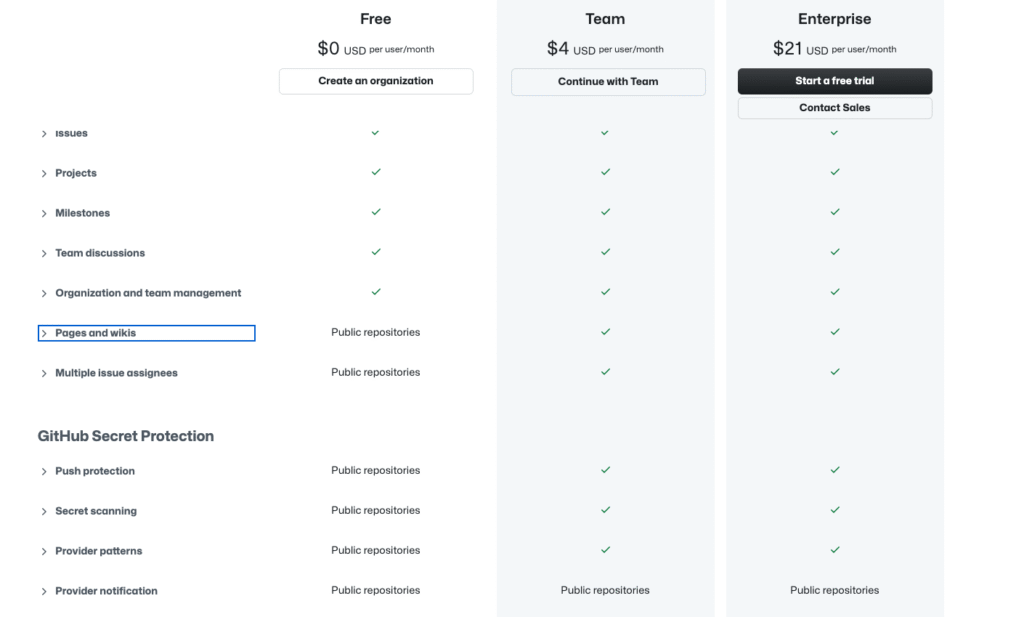
For most real-world use cases — a residential gate or small shared driveway — these limits are more than sufficient. If you outgrow them, all three platforms offer paid plans, but this system was designed to remain fully functional at zero cost.
System Architecture
This system combines hardware, backend logic, a web-based frontend, and cloud integrations into a clean, scalable structure. Everything is loosely coupled, serverless, and runs entirely on free-tier platforms — yet the experience feels seamless and unified to the user.
The architecture is designed to be simple but powerful:
- The ESP32 microcontroller is installed at the gate or barrier and connected to a standard relay. When triggered, it briefly closes a dry contact circuit to open the gate.
- The backend logic runs on a Cloudflare Worker and exposes a minimal API:
/open-barrier— accepts a 4-digit guest PIN and triggers the relay via Blynk if valid/generate-pin— authenticates a resident PIN and returns a new temporary guest PIN/device-status— checks if the ESP32 is online by querying Blynk Cloud
- All PINs (guest and admin) are stored in Cloudflare KV — a globally distributed key-value store with built-in TTL for automatic expiration.
- The frontend UI is a responsive React application, statically hosted via GitHub Pages, Netlify, or Cloudflare Pages. It includes:
- A guest view for PIN entry
- An admin view for generating new PINs
- A community information page (playground rules, contacts, weather)
- Relay triggering is handled via Blynk Cloud. The backend sends a simple API request to Blynk, which updates Virtual Pin
V0. The ESP32 listens for changes to this pin and activates the relay when set to1.
All of this is stitched together with a focus on portability, security, and ease of use — with minimal code and zero hosting costs.
This project doesn’t rely on any paid cloud service, GSM module, or mobile app. It’s built to be maintainable, installable, and understandable by anyone with basic electronics and web development experience.
If you’re new to ESP32 boards, this review has detailed info and tutorials to get you started.
What You’ll Need
This project uses standard, affordable components and services that are accessible to any maker or developer. All software platforms used are either open source or offer generous free tiers, and the only hardware required is a basic ESP32 setup with a relay.
Below is a full list of what you’ll need to replicate the system:
Hardware
- ESP32 DevKit board (with external antenna recommended for better Wi-Fi coverage)
- 5V relay module, single channel
- Power source for ESP32 (USB adapter, VIN input, or regulated DC)
- Wires and connectors (Dupont jumpers or screw terminals)
- Barrier/gate controller that accepts a dry contact input (most of them do)


Where to Buy the Needed Tools
If you want to build this project yourself, I’ve gathered the best offers I could find on Amazon. Most of these include discounts or bundles that make them worth considering:
- ESP32 Development Board – A solid board with BLE and Wi-Fi support.
Check it on Amazon - 5V Relay Module – Used to trigger the gate mechanism reliably.
Get one here - ESP32 External Antenna (IPEX/U.FL or PCB) – Boosts range for ESP32 boards with antenna connectors.
Find it on Amazon - Breadboard + Jumper Wires Kit – Helpful if you’re prototyping before finalizing the circuit.
Browse kits here
Useful Extras for Setup and Testing
These aren’t mandatory, but they make the build process much smoother:
- USB to UART Converter (CP2102 or CH340) – Required if your ESP32 board doesn’t have onboard USB.
Buy on Amazon - Multimeter – Great for checking voltage, continuity, and basic debugging.
See available options - Mini Screwdriver Set – Handy when connecting relays or installing the system in a case.
Grab one here
Disclosure: These are affiliate links. If you buy something through them, it won’t cost you anything extra, but it helps support the site and future DIY content. Thanks!
Software and Tools
- Arduino IDE (for flashing the ESP32)
- Visual Studio Code (for editing backend and frontend code)
- Wrangler CLI (for deploying to Cloudflare Workers)
- Node.js + npm (to build the frontend project)
Online Accounts (All Free)
- Cloudflare account (for backend deployment and KV storage)
- GitHub account (for hosting the frontend or using GitHub Pages)
- Blynk Cloud account (to trigger the ESP32 relay over Wi-Fi)
For a deeper dive into ESP32 modules, check out this detailed breakdown covering specs, use cases, and practical tips.
Each component plays a critical role in the system:
- The ESP32 physically controls the barrier
- The relay module acts as the switch
- Cloudflare Workers validate PINs and control flow
- Blynk provides the API interface to ESP32
- The frontend UI gives guests and admins a secure, intuitive web interface
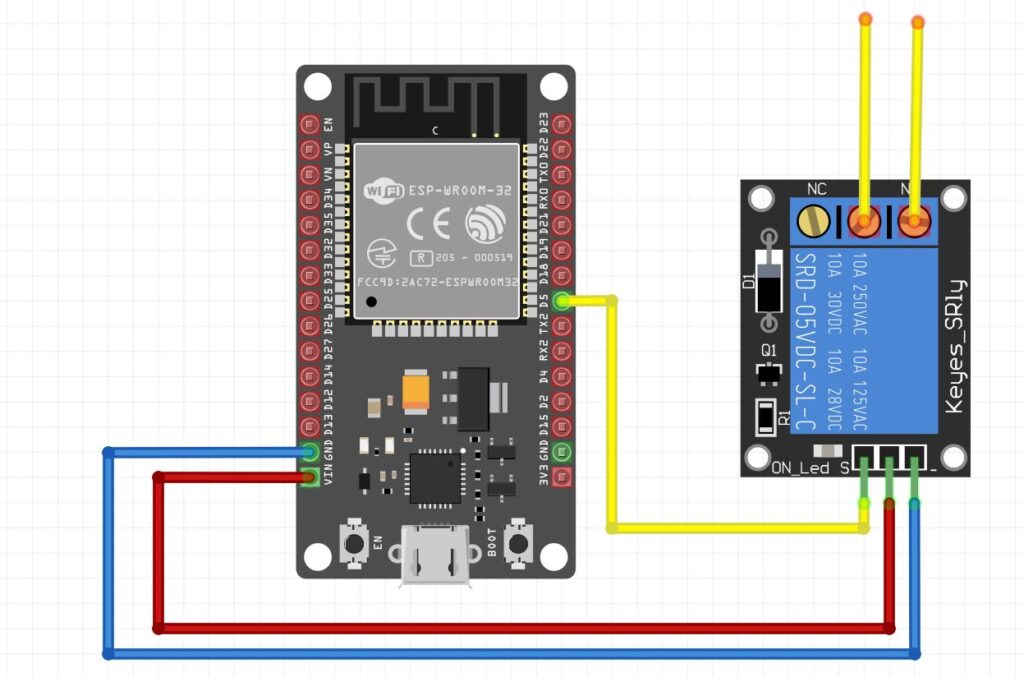
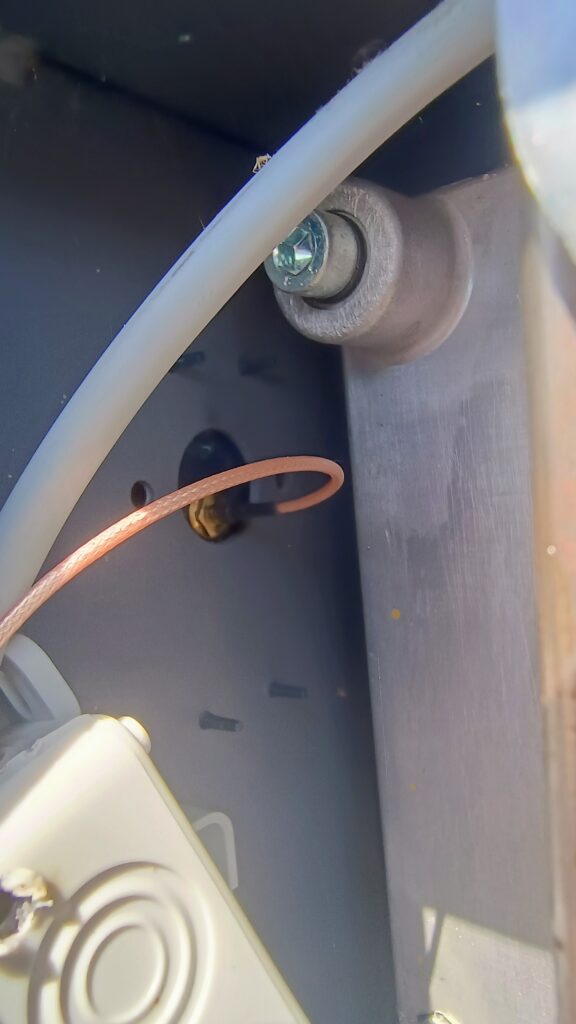
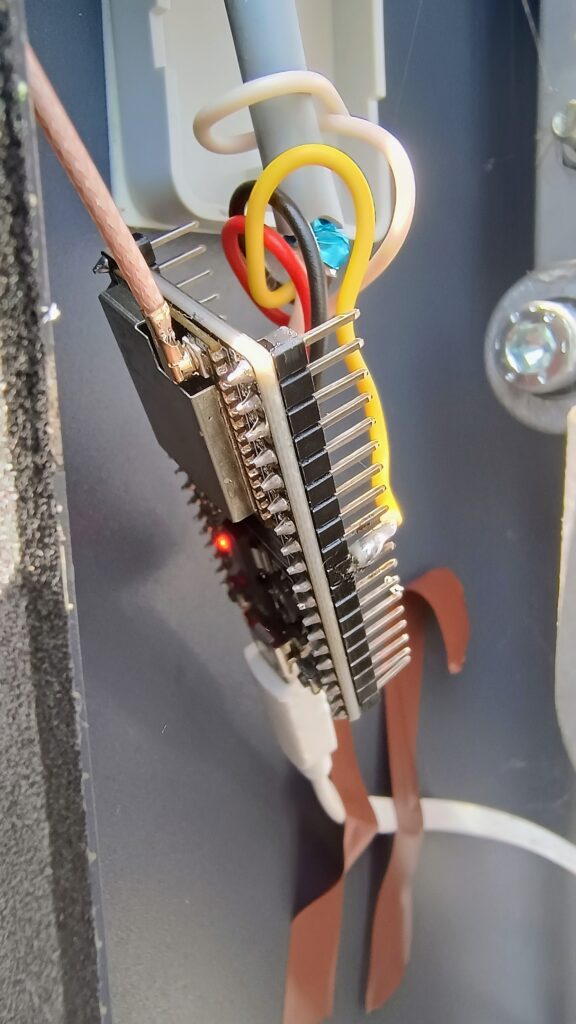
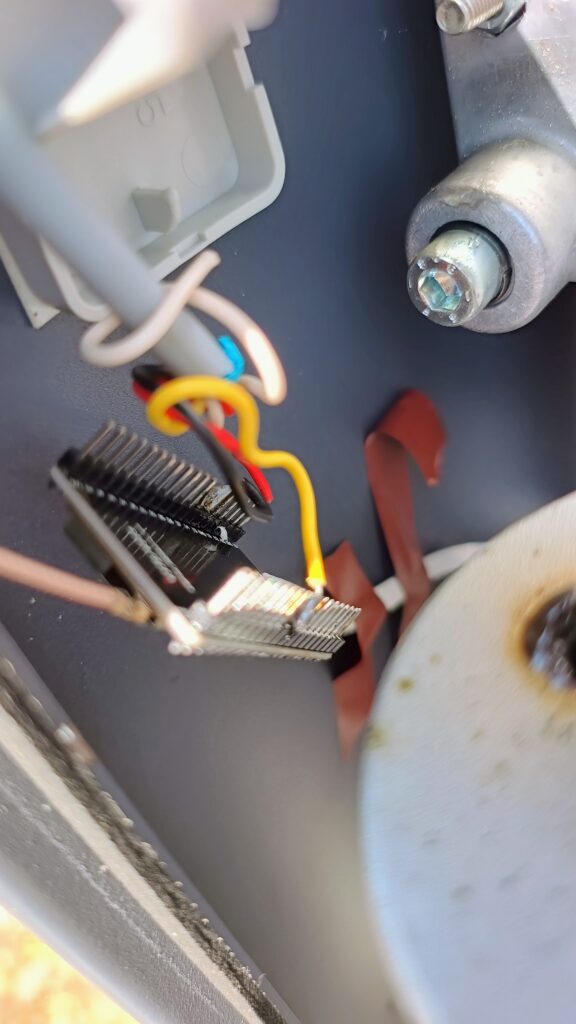
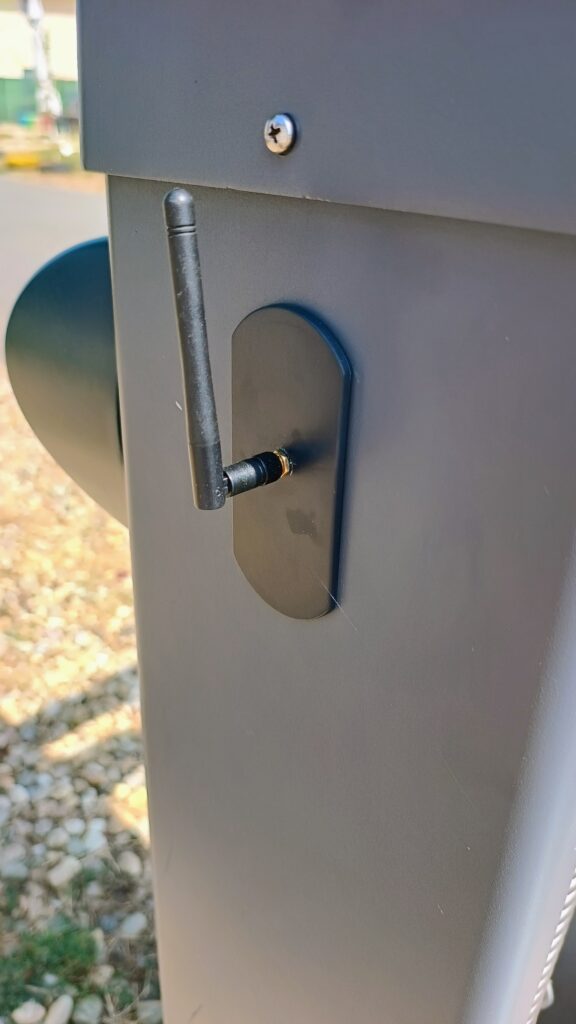
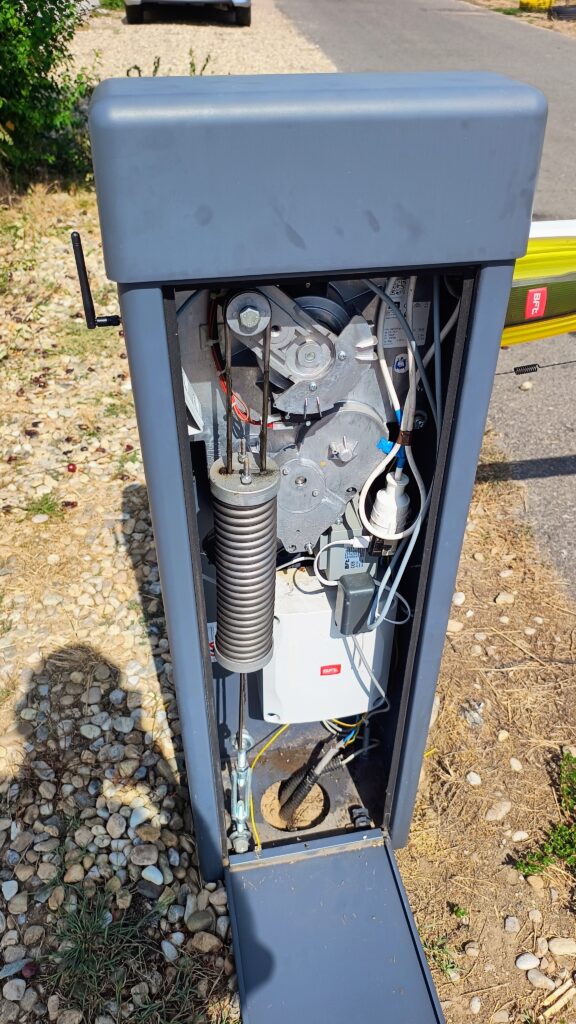
You can find links to the GitHub repositories and all required source code later in this guide.
Step 1: Set Up the Backend (Cloudflare Worker)
The backend is responsible for all logic in the system. It validates PINs, generates guest access codes, checks if the ESP32 is online, and triggers the gate using the Blynk API. This functionality is implemented in a Cloudflare Worker — a globally distributed, serverless function — and all PINs are stored in a lightweight, zero-maintenance Key-Value (KV) store.
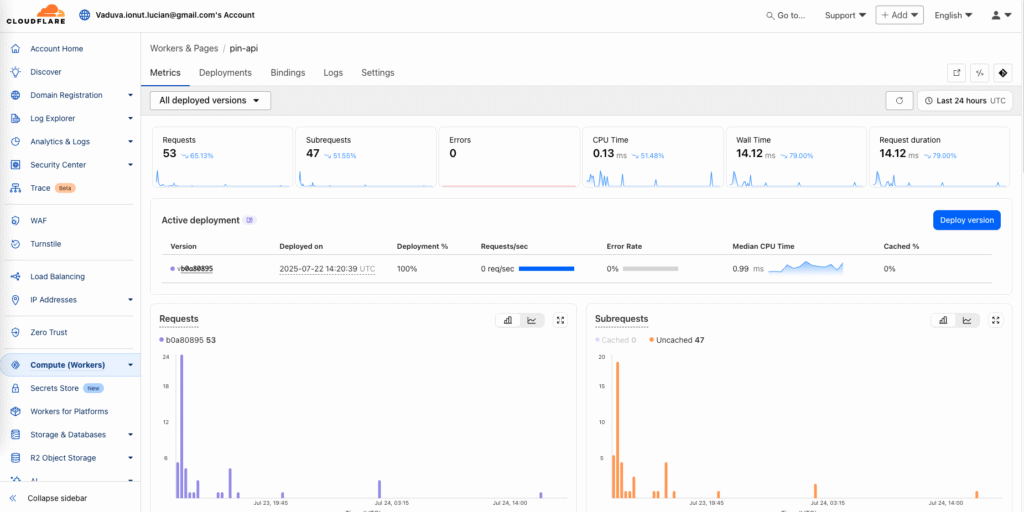
Everything is deployed using Cloudflare’s free tier, and there is no server to manage.
Create a Cloudflare Account
Go to dash.cloudflare.com and create a free account. You do not need to buy or register a domain. Cloudflare will assign you a personal subdomain on workers.dev when you deploy your first Worker.
This will become your backend API base URL, for example:
https://esp32-barrier-api.yourname.workers.dev
You’ll copy this into the frontend in a later step.
Install Wrangler CLI
Wrangler is the official CLI tool used to deploy Workers.
Install it using Node.js:
npm install -g wrangler
Check the installation:
wrangler --version
If needed, refer to the official Wrangler docs:
https://developers.cloudflare.com/workers/wrangler/install
Log In to Cloudflare
Authenticate with your Cloudflare account:
wrangler login
This opens your browser to confirm access.
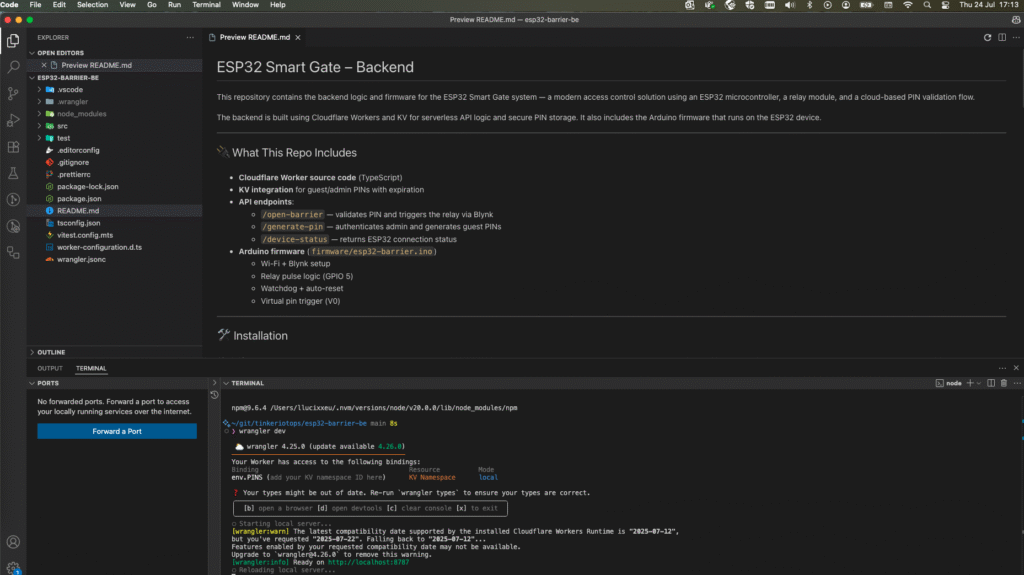
Clone the Backend Repository
Open a terminal and run:
git clone https://github.com/tinkeriotops/esp32-barrier-be.git
cd esp32-barrier-be
Open the folder in Visual Studio Code:
code .
You can use any editor, but VS Code makes editing and deploying easier.
Create the KV Namespace
This project uses Cloudflare KV to store guest and admin PINs with expiration logic.
Create a KV namespace called PINS:
wrangler kv:namespace create PINS
This will return an id. Open the wrangler.toml file and paste it like this:
[[kv_namespaces]]
binding = "PINS"
id = "your-returned-namespace-id"
Save the file.
More info: Cloudflare KV Docs
Set Required Environment Variables
Open index.ts and find this line:
BLYNK_TOKEN: string;
This value is injected from your Cloudflare Worker secrets. To set it:
wrangler secret put BLYNK_TOKEN
Paste in your token from the Blynk Cloud Console. This will be used to send relay triggers to your ESP32 over the Blynk API.
Deploy the Worker
From the project folder, deploy the backend:
wrangler deploy
If successful, you’ll receive your live API URL:
https://esp32-barrier-api.yourname.workers.dev
This URL serves three routes:
/open-barrier– validates guest PINs and triggers the ESP32/generate-pin– authenticates admin PINs and generates guest PINs/device-status– checks the online status of the ESP32 via Blynk
You will use this domain in the frontend configuration in the next step.
Add Your First Admin PIN
Before the admin interface can be used, you need to manually store at least one admin PIN in the KV store.
Run the following command:
wrangler kv key put 1234 9 --binding=PINS --remote
This creates the admin PIN 1234. The value 9 is used internally to identify admin-level access.
You can add multiple admin PINs this way or remove them later using wrangler kv key delete.
Step 2: Set Up the Frontend (Web Interface)
The frontend is a responsive, mobile-first web interface built with React and Tailwind CSS. It serves as the entry point for guests and admins. Guests enter access PINs, and admins generate them using a secure interface.
This part of the project is deployed automatically using GitHub Actions and GitHub Pages. Once configured, every push to the main branch will trigger a build and deployment to your live site.
Clone the Frontend Repository
To deploy the frontend at the root of your GitHub Pages domain (e.g. https://tinkeriotops.github.io/), the repository must be named exactly like your GitHub username followed by .github.io. This is a GitHub Pages convention that automatically serves the site from the domain root instead of a subfolder.
Clone the repository and open it in Visual Studio Code:
git clone https://github.com/tinkeriotops/tinkeriotops.github.io.git
cd tinkeriotops.github.io
code .
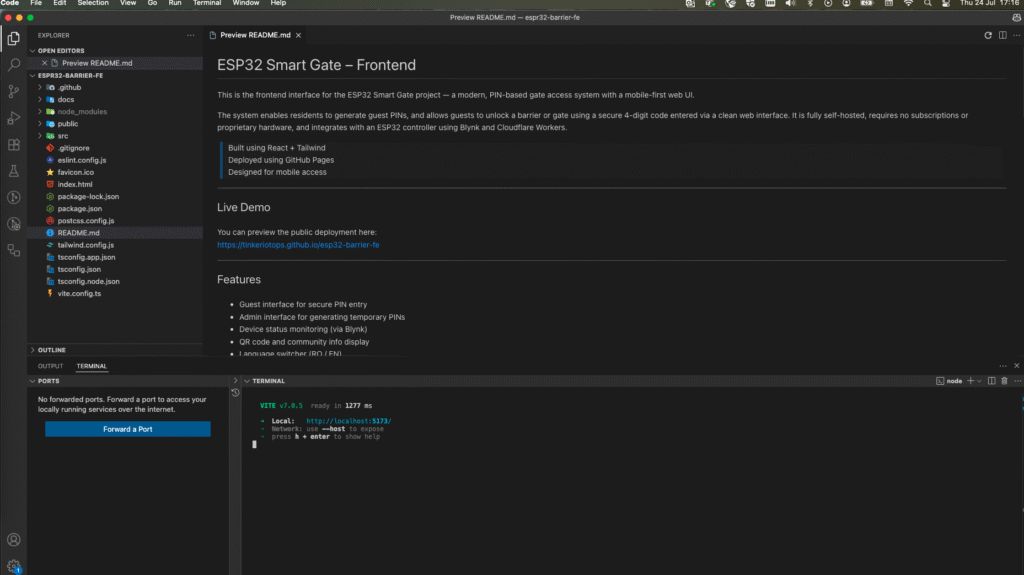
⚠️ If your GitHub username is different, replace
tinkeriotopsin both the URL and folder name to match your actual GitHub username.
Install Dependencies
In the terminal:
npm install
This installs all required frontend packages: React, Vite, Tailwind CSS, i18next, and more.
Set the Backend API URL
In both of the following files:
src/hooks/useBarrier.tssrc/components/GuestPinGenerator.tsx
Find this line:
const CLOUDFLARE_API = "https://esp32-barrier-api.workers.dev";
Replace it with your deployed backend Worker URL from Step 1:
const CLOUDFLARE_API = "https://your-api-name.workers.dev";
Save both files.
Customize Site Content (Optional)
You can personalize your community portal:
header.png– logo or neighborhood imagecontacts.json– local contact listPlaygroundRulesView.tsx– shared rules for kids or residentsqrcode.png– QR linking to your guest page (e.g./guests)
Build to docs/ Folder
GitHub Pages will serve your site from the docs directory. So instead of the default Vite dist/ folder, you’ll build into docs:
- Open
vite.config.jsand set:
export default defineConfig({
  base: "/",
  build: {
    outDir: "docs",
  },
  ...
});
- Then build the project:
npm run build
This will output the static site files into the docs/ folder.
GitHub Pages Deployment (via GitHub Actions)
Your repository already includes a GitHub Actions workflow file: .github/workflows/deploy.yml
This file automates deployment whenever you push to the main branch.
No manual deploy step is required.
Once you’ve pushed:
git add .
git commit -m "Update frontend"
git push origin main
GitHub will:
- Run the build command
- Upload the
docs/folder - Deploy the result to GitHub Pages
Your live site will be accessible at:
https://your-repository.github.io/
Note: You can change the repo name or use a custom domain by adjusting the base path and GitHub Pages settings.
Also, github pages feature have to be enabled for your
Step 3: Set Up Blynk
Blynk Cloud is used to remotely trigger the ESP32’s relay. When a guest enters a valid PIN, the backend sends a signal to Blynk, which updates a virtual pin (V0). The ESP32 listens for this value and activates the relay when needed.
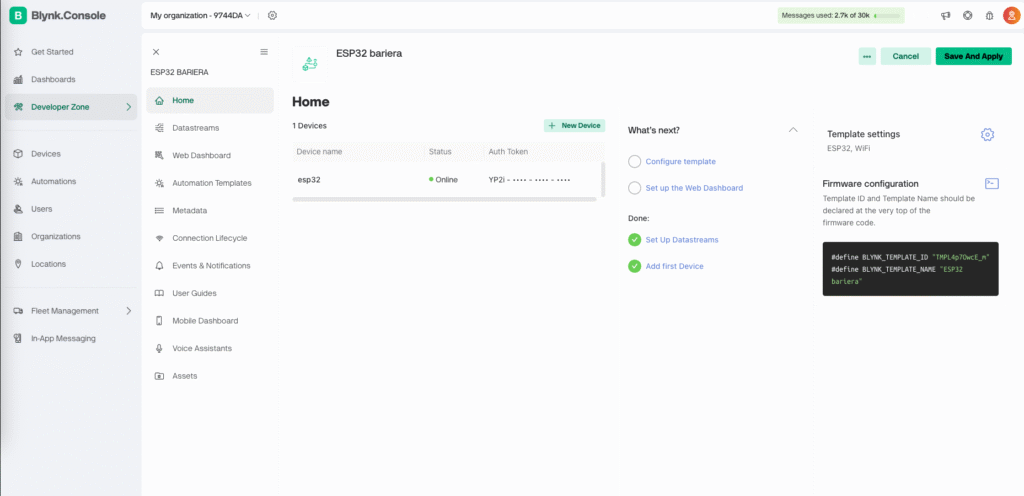
Blynk is reliable, fast, and works well over Wi-Fi — and its free tier is more than enough for this project.
Create a Blynk Account
Go to https://blynk.cloud and create a free account.
After logging in, you’ll land in the Blynk Console. This is where you’ll configure your project, template, and device.
Create a Template
- In the left sidebar, go to Templates
- Click + New Template
- Name it something like
SmartGate - Set the hardware type to ESP32
- Leave firmware settings empty for now and click Create
Add a Virtual Pin
- Inside your template, go to the Datastreams tab
- Click + New Datastream
- Choose Virtual Pin
- Configure it like this:
- Virtual Pin:
V0 - Data type: Integer
- Min: 0
- Max: 1
- Name:
Trigger
- Virtual Pin:
- Save the datastream
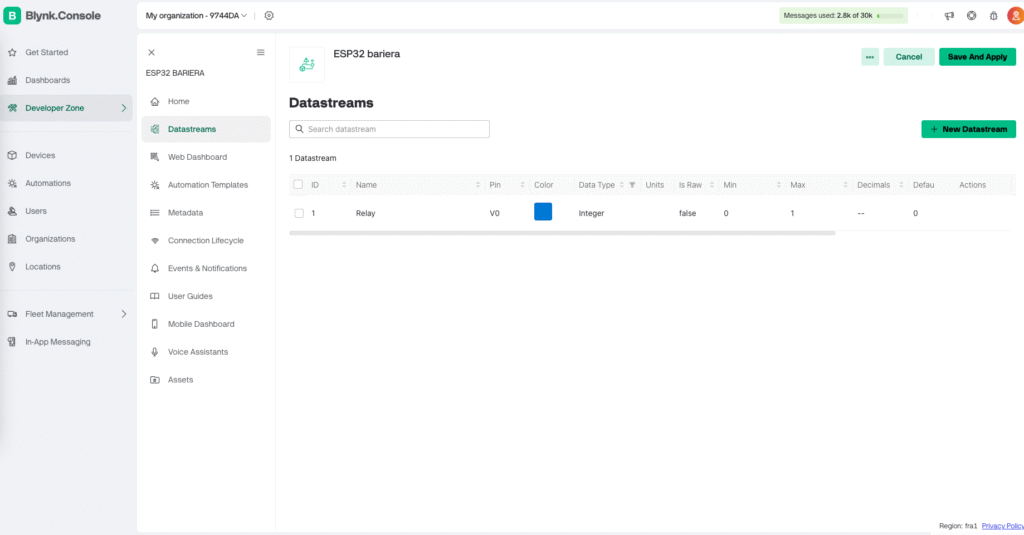
This virtual pin will be toggled by the backend — 1 to open the gate.
Create a Device
- In the sidebar, go to Devices
- Click + New Device → From template
- Select the template you just created (
SmartGate) - Name the device (e.g.
BarrierESP32) - Click Create
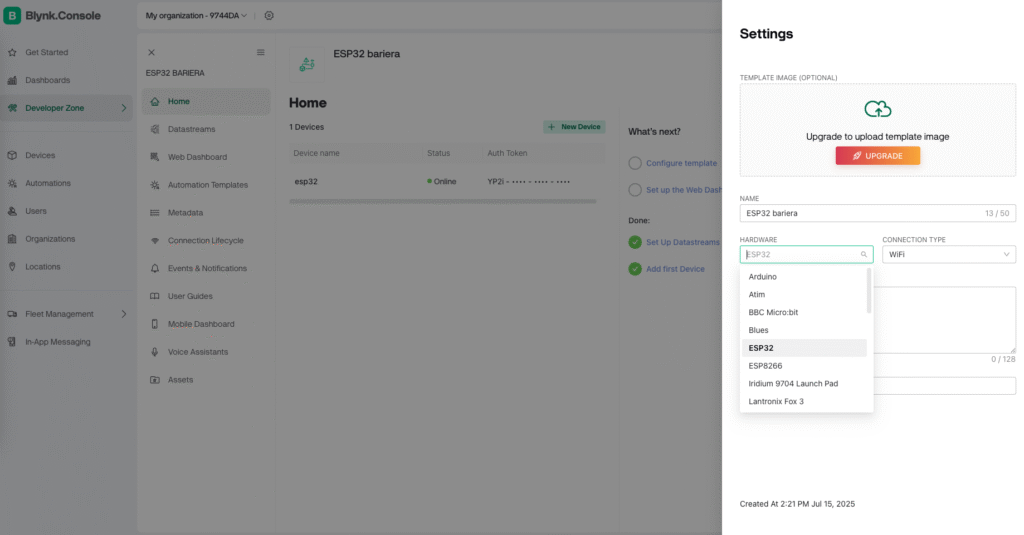
This generates an instance of your ESP32 device in the Blynk Cloud.
Get the Blynk Auth Token
- In the new device page, go to the Info tab
- Copy the Authentication Token
- Store this somewhere safe — you’ll need it for:
- Flashing the ESP32
- Adding the secret to the Cloudflare Worker
Add the Token to the Cloudflare Backend
Return to your backend project folder and run:
wrangler secret put BLYNK_TOKEN
Paste in the token when prompted.
This allows your Worker to securely trigger the ESP32 when a PIN is accepted.
At this point:
- Your ESP32 is registered in Blynk Cloud
- The API knows how to reach it using the token
- The relay pin (
V0) is ready to receive open commands
In the next step, we’ll flash the ESP32 with firmware that connects to Blynk, listens for V0, and triggers the relay when needed.
Step 4: Flash the ESP32 Firmware
The ESP32 acts as the physical controller for your gate or barrier. In this step, you’ll flash the firmware using the Arduino IDE. Once running, the device will connect to Wi-Fi, communicate with Blynk Cloud, and respond to valid PIN requests by briefly triggering a relay on GPIO 5.
All firmware logic is included directly in the backend repository.
Download the Firmware
Open the backend repository:
https://github.com/tinkeriotops/esp32-barrier-be
Navigate to:
firmware/esp32-barrier.ino
This file contains all the necessary code, including:
- Wi-Fi and Blynk setup
- Virtual pin trigger listener (V0)
- Relay activation and cooldown
- Watchdog logic
- Optional reset after failed connection attempts
Install the Arduino IDE
Download the latest version from the official site:
https://www.arduino.cc/en/software
Add ESP32 Board Support
- Open Arduino IDE
- Go to File → Preferences
- In Additional Board Manager URLs, paste:
https://raw.githubusercontent.com/espressif/arduino-esp32/gh-pages/package_esp32_index.json
- Go to Tools → Board → Boards Manager
- Search for “ESP32 by Espressif Systems” and click Install
Configure the Firmware
At the top of esp32-barrier.ino, you must define your Blynk Template ID and Template Name. These come from your Blynk Template (set up in Step 3).
#define BLYNK_TEMPLATE_ID "TMPLxxxxxxxx"
#define BLYNK_TEMPLATE_NAME "SmartBarrier"
To find these values:
- Go to https://blynk.cloud
- Open your Template
- Copy the Template ID and Template Name from the header section
Then configure your connection details:
const char* ssid = "YOUR_WIFI_SSID";
const char* password = "YOUR_WIFI_PASSWORD";
const char* blynkToken = "YOUR_BLYNK_AUTH_TOKEN";
const int relayPin = 5;
These must match your local setup and Blynk credentials.
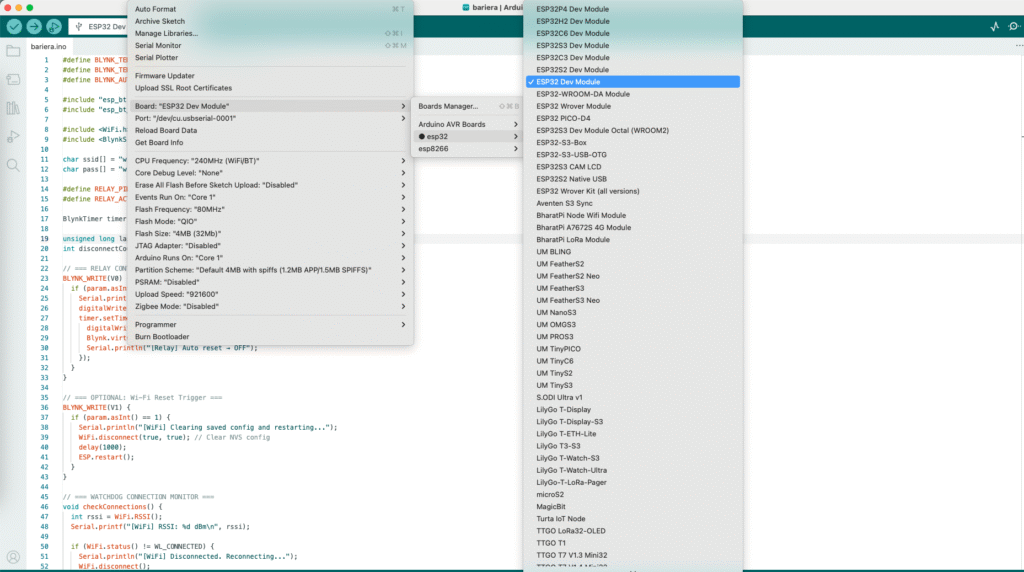
Select Board and Port
- Go to Tools → Board and select ESP32 Dev Module
- Go to Tools → Port and choose the correct USB serial port
If no port appears:
- Reconnect the board
- Try holding the BOOT button when plugging in
Upload the Sketch
Click Upload. If prompted, press BOOT until upload starts. Once done, open Tools → Serial Monitor to confirm successful startup.
You should see logs like:
[INFO] Connecting to WiFi...
[INFO] WiFi connected
[INFO] Connected to Blynk
[INFO] Awaiting V0 trigger
Test the Trigger Flow
Once flashed:
- Use the admin interface to generate a guest PIN
- Enter it in the guest page
- The backend verifies the PIN, then calls Blynk API (
V0 = 1) - ESP32 listens for this change and triggers the relay on GPIO 5
The relay should click briefly, activating the barrier or gate.
With your ESP32 flashed and connected, your entire system is now physically functional and connected to the cloud.
How the System Works — From User to Hardware
Despite spanning hardware, APIs, cloud services, and frontend code, this system is built to feel effortless for the user. Residents and guests interact with a clean web interface, while all the technical logic happens securely in the background — on platforms you don’t have to manage.
Here’s how it works in practice.
Guest Access Flow
- A visitor receives a 4-digit PIN from the resident.
- They open the guest page in their mobile browser.
- They enter the PIN into the web interface.
- The frontend sends the PIN to the backend API (
/open-barrier). - The backend checks if the PIN is valid and unexpired (via Cloudflare KV).
- If valid, the backend triggers a command to the Blynk Cloud (
V0 = 1). - The ESP32 detects the change and activates the relay for a short pulse.
- The barrier opens. The guest sees a confirmation message.
If the PIN is invalid or expired, an error is shown — and no command is sent.

Admin Flow
- The resident opens the admin interface in their browser.
- They enter their admin PIN (e.g.
1234). - The frontend sends it to the backend via
/generate-pin. - If the PIN is authorized (stored in KV with type
9), a new guest PIN is created. - The response includes the new 4-digit code and its expiration timestamp.
- The admin copies and shares the PIN and guest page link — no app or special setup needed.

How It All Connects
- Frontend (React + Tailwind)
Serves a responsive UI for both guests and admins. Runs entirely on GitHub Pages, Netlify, or any static host. - Cloudflare Worker API
Handles secure routing, PIN validation, and Blynk API calls. It’s fast, serverless, and deploys globally on Cloudflare’s free tier. - Cloudflare KV Storage
Stores guest and admin PINs with time-based expiration (TTL). There’s no traditional database to configure or maintain. - Blynk Cloud
Receives the validated open command and sends it to the ESP32 using Virtual PinV0. Acts as a secure tunnel between the backend and device. - ESP32 + Relay
Listens for theV0trigger and pulses a relay on GPIO 5 to open the barrier. It stays online using Wi-Fi, with retry and watchdog logic built in.
Built for Real Life
The best part is how this system combines all those moving parts into something that feels seamless. No apps, no login forms, no QR readers. Just a small board, a free backend, and a secure web interface that anyone can access from their phone.
It’s modern access control — simplified and decentralized — and it works.
Get the Code
The entire system is open-source and available across two public GitHub repositories — one for the backend (API logic and firmware), and one for the frontend (web interface).
Each repository is structured, documented, and ready to clone or fork. You can use the code exactly as-is or adapt it to suit your own environment.
Backend (API + Firmware)
Repository:
https://github.com/tinkeriotops/esp32-barrier-be
What it includes:
- Full Cloudflare Worker API source code
wrangler.tomlconfiguration for deployment- Environment variable setup instructions (e.g. BLYNK_TOKEN)
- KV namespace support
- Ready-to-deploy endpoints:
/open-barrier/generate-pin/device-status
- Arduino firmware file:
firmware/esp32-barrier.ino
Includes everything required to flash the ESP32:- Wi-Fi + Blynk setup
- Virtual pin listener (V0)
- Relay control
- Watchdog and auto-reboot logic
Frontend (Web Interface)
Repository:
https://github.com/tinkeriotops/tinkeriotops.github.io
What it includes:
- Mobile-first React app built with Vite and Tailwind CSS
- Guest and admin views
- Language switcher (i18n-ready)
- Device status indicators
- Weather and community info panel
- Playground rules page
- GitHub Actions workflow for auto-deploying to GitHub Pages
- Configuration for backend API endpoint injection
The frontend is designed to be lightweight, fast, and easy to deploy. It runs on any static hosting platform, and the entire interface is optimized for mobile access — making it perfect for visitors arriving at your gate.
Support the Project
This system was developed from scratch, tested in real-world conditions, and refined with care. It brings together frontend, backend, firmware, and cloud infrastructure into a functional, self-hosted access control platform — and it’s shared freely for personal use.
If this project helped you save time, inspired a new idea, or solved a real problem, you can support future updates and development in a few meaningful ways:
- Star the repositories on GitHub
- Share the project or blog article with others in the DIY or smart home space
- Send feedback, suggest improvements, or contribute with ideas
- Make a small donation to support continued development and documentation
Support link:
https://ko-fi.com/tinkeriot
This is an active project. Software updates will continue to improve the frontend, backend, and firmware — including usability enhancements, security hardening, and new deployment options. If you’ve built on top of this or adapted it for another environment, feel free to let me know.
Thanks for respecting the work behind this and for supporting projects that aim to stay open, clean, and useful to others.


1 thought on “A Web-Based Smart Gate System with PIN Access — Built with ESP32 and No Hosting Costs”