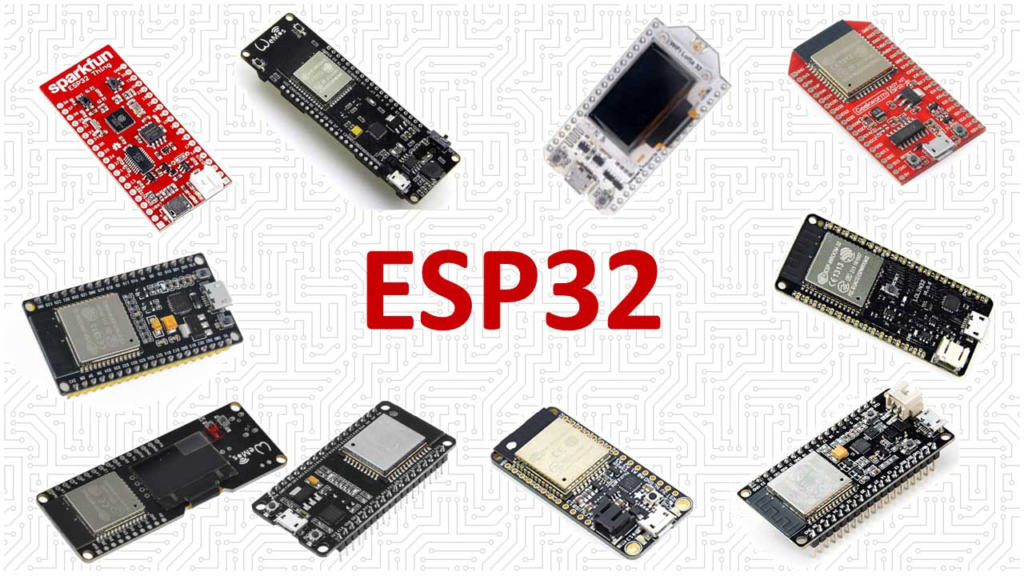
A few years ago, I was deep into building sensor nodes, displays, and web-connected gadgets with the good old ESP8266. And it worked. But as my projects grew — more sensors, faster data, Bluetooth requirements — I started hitting limits.
Then I picked up my first ESP32 development board… and everything changed.
The ESP32 isn’t just an upgrade — it’s a whole different level of capability, without losing the simplicity that makes ESP-based boards so appealing. If you’re working on anything from a smart home controller to a wearable device, or even a connected robot, the ESP32 has probably already crossed your radar.
In this article, I’ll walk you through what makes the ESP32 special, why I use it, what to expect from it, and a few quirks you should know upfront. This is hands-on, from a maker’s perspective — not a datasheet dump.
From ESP8266 to ESP32: The Upgrade That Feels Like Magic

If you’ve used the ESP8266, you probably love how easy it is to get a sensor online in minutes. But here’s what I ran into after a while:
- Not enough pins
- Only one analog input (and a bad one)
- No Bluetooth
- Not ideal for multitasking
- Limited RAM
The ESP32 fixes all of that.
It’s dual-core. It has Bluetooth and BLE. Tons of GPIOs. Multiple ADCs that actually work. Two DACs. Capacitive touch. SPI, I2C, UART galore. And you can still program it in the Arduino IDE.
The best part? It’s cheap. Not “ESP8266 cheap,” but close — often around $4–$6 for solid boards.
Buy it now at the lowest price from Amazon!
ESP32 Specs in Maker Terms
Here’s what you’re really working with on a typical ESP32-WROOM-32 dev board:
| Feature | Detail |
|---|---|
| CPU | Dual-core 240MHz (Tensilica Xtensa LX6) |
| RAM | 520KB SRAM + optional 4MB PSRAM |
| Flash | Usually 4MB (up to 16MB depending on board) |
| Wi-Fi | 802.11 b/g/n with full TCP/IP stack |
| Bluetooth | Classic Bluetooth + BLE (BT 4.2) |
| GPIO | Up to 34 usable pins (varies by board) |
| ADC | 18 channels (12-bit), though not all perfect |
| DAC | 2 channels (8-bit output) |
| UART / SPI / I2C | 3 UARTs, 3 SPI buses, 2 I2C buses |
| PWM | 16 channels |
| Extras | Touch sensors, CAN bus, SD card support |
| Power | 3.3V logic (5V USB input via regulator) |
This thing isn’t a microcontroller — it’s a multi-core connected brain for your project.
Real Use Cases: Where the ESP32 Shines
Let me walk through a few things I’ve built (or seen others build) that really show off what the ESP32 can do:
🌀 Bluetooth Beacons and BLE Sensors
I once used the ESP32 to make a BLE-based sensor broadcaster that talked to my phone directly — no Wi-Fi, no MQTT, just straight BLE. ESP8266 couldn’t even think about that.
🎧 Streaming Audio via I2S
Yes, the ESP32 can stream MP3 audio using an I2S DAC or amp. You can make a full Wi-Fi internet radio. Try that on an 8266? Forget it.
📸 Camera Projects
With the ESP32-CAM variant, I’ve streamed live video over Wi-Fi in a tiny package. It’s a bit of a power hog, but amazing for surveillance or image-based sensors.
💡 Capacitive Touch Interfaces
Want to build a lamp with touch-on/off or a smart wall switch? The ESP32 has capacitive touch inputs baked into the silicon.
📟 Displays + Web UIs
I’ve run an OLED display and a web dashboard on the same ESP32, polling sensors in the background, serving AJAX updates via Wi-Fi — all without breaking a sweat.
What It’s Like to Work With
Honestly, the experience feels like ESP8266… but smoother.
- You can still use the Arduino IDE, or step up to PlatformIO or ESP-IDF.
- Most ESP8266 libraries just work or have ESP32 variants.
- You can multitask using FreeRTOS (built-in!), assign code to cores, or just write Arduino-style
loop()code if you’re keeping it simple. - OTA updates are easier and more reliable.
- It feels less fragile — fewer random resets or Wi-Fi drops.
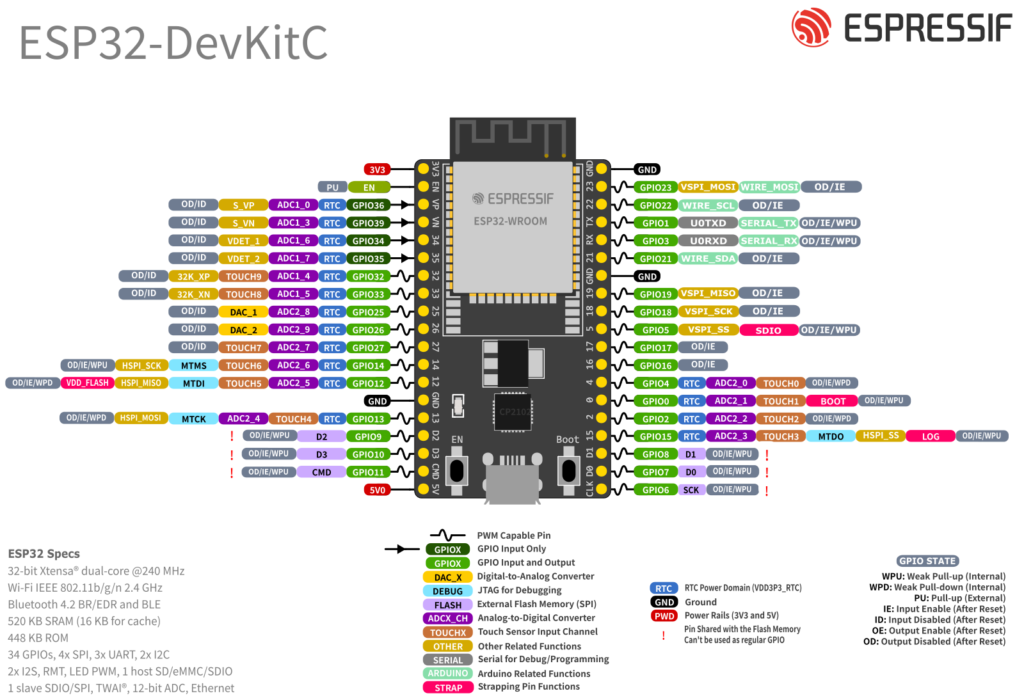
The only thing you need to watch out for is pin multiplexing. Not all pins are equal, and some (like GPIO34-39) are input-only.
ESP32 Pinout: Powerful but a Bit Tricky
One thing that confused me at first — and still trips up a lot of people — is the ESP32’s pinout. There are a lot of GPIOs, but not all of them are created equal.

Some pins are input-only, some are strapped for boot mode, and a few are just flat-out unusable depending on your board layout.
Here’s what I’ve learned:
🧠 General GPIO Tips
- GPIO0, GPIO2, GPIO15 are used during boot — avoid pulling them high or low unless you know what you’re doing.
- GPIO34–39 are input-only. You can use them for sensors, but not for things like LEDs or relays.
- GPIO6–11 are usually tied to the flash chip — don’t touch them.
- GPIO12 can cause boot failures if pulled high during startup.
- GPIO16, 17, 18, 19, 21, 22, 23, 25, 26, 27, 32, 33 – usually safe and flexible for most use cases.
You’ll want to check your board’s schematic or pinout diagram, because some pins might be tied to onboard LEDs, sensors, or the USB chip.
Here’s a simple reference I keep handy:
| GPIO | Notes |
|---|---|
| 0 | Boot mode sensitive — use with caution |
| 1/3 | UART TX/RX — can be used for debug |
| 2 | Often connected to onboard LED |
| 4/5 | Safe, good general-use pins |
| 12 | Boot-sensitive — avoid pulling high |
| 13–15 | Safe, used often for SPI |
| 16–19 | Safe for most uses |
| 21–23 | Commonly used for I2C, SPI, general IO |
| 25–27 | Great general-purpose pins |
| 32–33 | Safe analog + digital IO |
| 34–39 | Input-only — great for sensors, not output |
🔌 Tip: If you ever get a board that won’t boot after wiring something up — unplug your peripherals and try again. It’s usually a boot pin issue.
ESP32 Power Consumption: What to Expect
The ESP32 is more powerful, which means — unsurprisingly — it uses more power than the ESP8266.
That said, you can absolutely use it for battery-powered projects, especially if you take advantage of its sleep modes.
⚡ Typical Power Consumption (Realistic Estimates)
| Mode | Current Draw (Approx.) |
|---|---|
| Active Wi-Fi + CPU | ~160–300 mA |
| Light Sleep | ~2.5 mA |
| Deep Sleep | ~10–150 µA |
| Ultra Deep Sleep | ~5 µA (ESP32-S2/C3) |
📌 These values vary by board — voltage regulators and onboard LEDs can draw idle current even when the chip sleeps.
🔋 Tips for Lowering Power Draw
- Use Deep Sleep between sensor readings. The ESP32 can wake from RTC timer, touch input, or external GPIO.
- Disable unnecessary peripherals (Wi-Fi, Bluetooth, ADC, etc.)
- Power down sensors when not in use
- Choose a board with an efficient LDO regulator (avoid AMS1117 for battery projects)
- Consider external power management chips (like a buck converter with auto shutoff)
In one of my sensor projects, I ran an ESP32 with a BME280 sensor off a single 18650 Li-ion battery — waking up every 10 minutes, posting data to the cloud, then sleeping. It lasted almost 3 weeks.
Firmware Options for ESP32
Like the ESP8266, the ESP32 supports multiple firmware platforms depending on your style:
🔧 Arduino Core for ESP32
The go-to for most makers. Works with the Arduino IDE and PlatformIO. Tons of libraries.
🐍 MicroPython
Still great for fast prototyping. The ESP32 has more RAM than the ESP8266, so it runs better — you can even do some basic graphics and web interfaces.
🧱 ESP-IDF (Espressif IoT Development Framework)
This is the official toolchain. It’s CMake-based, powerful, and production-ready. If you’re building commercial products or need fine-grained control, ESP-IDF is the way.
🧰 Tasmota & ESPHome
Both support ESP32, so if you’re building for Home Assistant, you can go no-code with YAML configs or web GUIs.
Pros and Cons (Based on Real Use)
👍 What I Love
- Dual-core makes multitasking easy
- Bluetooth unlocks tons of possibilities
- Way more GPIO than ESP8266
- Built-in touch, DACs, and better ADCs
- Stable Wi-Fi, good range
- Still cheap enough to use in quantity
⚠️ Things to Watch
- More power-hungry than ESP8266
- GPIO pin mapping is trickier
- Some boards have quirky USB chips or bad power regulation
- OTA size limit can bite you (keep firmware compact)
- ADCs are still noisy without external filtering
Favorite ESP32 Boards (Personal Picks)
- ESP32 DevKitC (the classic): Great for breadboarding, solid stability (Buy it on Amazon)
- ESP32-WROOM-32: Good all-rounder (Buy it on Amazon)
- ESP32-CAM: For camera-based or ultra-compact projects (Buy it on Amazon)
- TinyPICO: Smaller, premium ESP32 with USB-C and battery support (Buy it on Amazon)
- Node32S / D1 Mini ESP32: Compact and breadboard-friendly (Buy it on Amazon)
Final Thoughts
The ESP32 is the board I now reach for when a project gets serious — or when I just want more breathing room.
It’s powerful enough to do things like serve full web UIs, handle OTA updates, stream data, run animations, and still have headroom left. It’s also stable, reliable, and battle-tested by the community.
Yes, the ESP8266 is still great. But if I had to choose just one board to base most of my future IoT builds on, the ESP32 would win every time.

6 thoughts on “ESP32 Development Board Review: Why It’s My Go-To for Serious DIY Projects”